


The coronavirus/COVID-19/SARS-CoV2 pandemic, with its global reach, has resulted in both suggestions and orders that people wear face masks when in public or medical settings.
I have spent nearly two months sewing face masks to donate to medical workers, hospital guests, and my family and neighbors. I've tried making at least three different designs. Through trial and error and a lot of research, I designed this 3D Origami face mask pattern and tutorial to share with those who would also like to make masks to donate. It's my favorite pattern and fits the best, especially because it helps reduce fog on my glasses. (If the economic slowdown has impacted you, feel free to use this pattern to put food on your table.)
For a printer-friendly version of this DIY face mask sewing tutorial, click here.
- 100% cotton fabric (11” x 17.5”)
- T-shirt yarn (or old t-shirt to make the ties; cut at 1.5” wide)
- Sewing machine
- Thread
- Scissors
- Pins
- Iron and ironing board

Pattern Size Guide (Read this post about creating a pattern template)
|
Size |
Rectangle Dimensions |
Corner Crop |
|
Child S-M (5-10 yrs) |
7.5” x 6” |
1.75” |
|
Child L-XL (11-12 yrs) |
8.5” x 6.5” |
1.75” |
|
Teen/Adult XS |
9.75” x 7” |
2” |
|
Adult S-M |
10.25” x 7.25” |
2.25” |
|
Adult L-XL |
10.5” x 8” |
2.25” |
2. Sew a 1/4" seam on six sides, leaving the right and left sides open.
3. Cut a strip 1.5" x 10". This will be sewn into straps later.

4. Fold strip edges to center (forming bias tape). No need to press. You can just get the end started and form it as you sew.

5. Sew about 1/4" seam through all four layers of fabric.

6. Now you have a strap that will be used to hold the ties in place.

7. Cut the strap into four pieces that are 2.5" long.

8. Cut notches in the four corners to create flat corners when the mask is turned inside out.

9. Turn inside out.

10. Flatten seams to prepare for pressing.

11. Fold in opened edges 1/4" and press all seams.

12. Closer look at the opened edges folded in and ironed.

13. Create a template to guide the folds in the next few steps. 2.75" for women; 3.5" for men.

14. Fold top over. The floral side will be the outside of the mask; the solid blue side will become the inside of the mask (that touches your face).

15. Fold the bottom up. Hold the folds in place.

16. Slide out the template.

17. Press the folds.

18. Now your mask should look like this.

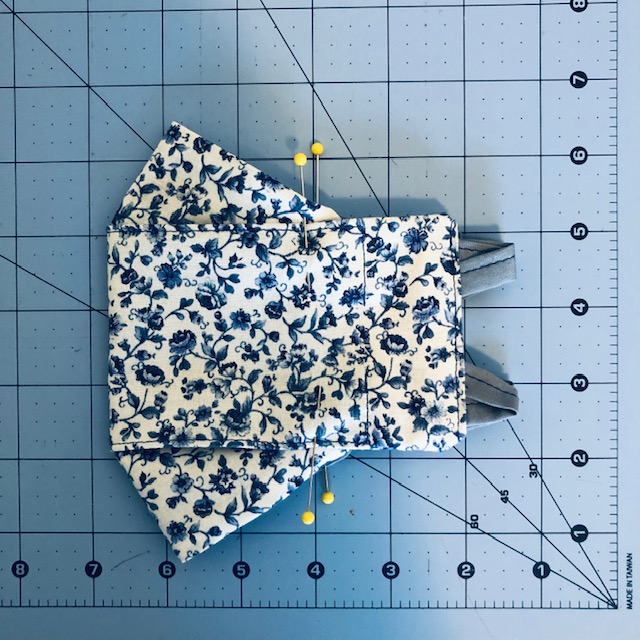
19. Fold two straps and slide them in the top and bottom of the openings on the right and left side of the mask. Pin in place.

20. Sew a 1/8" seam to secure the straps and close the opening.

21. Repeat on other side. Right and left ends now have straps (to hold the ties) and are sewed closed.

22. This part is a little trickier. You are going to sew an open rectangle, but only on the parts of the mask where the floral folds overlap the solid blue fabric. Begin sewing 1.25" from the far right edge of the mask (not including the straps). Remember to backstitch each end.

23. Turn the fabric and sew a tight seam (1/8" or less) down the side. Stop 1.25" from the end.

24. Stopping 1.25" from the end, turn the mask and sew the floral folds where they overlap the solid blue fabric.

25. After sewing the fold overlaps in place, turn the mask and sew a tight seam down the side until it closes the rectangle.


26. Can you see the open rectangle? It is only open where the flowered flap does NOT overlap the solid blue fabric. (Click on the image to enlarge it to see the seams better.)

27. Open the mask and fold it the opposite direction, like in the image below.

28. Your mask should now look like this (below).

29. Pin where the flaps and folded fabric overlap (on both sides). Pin while mask is folded to get the placement right.


30. Sew the flap in place with a 1/8" seam--just enough to tack the flap open.


31. Repeat on all four corners and remove pins.


32. Cut 54" of t-shirt yarn. I recommend 1.5" wide t-shirt yarn. (For a tutorial on how to make t-shirt yarn: “DIY T-shirt Yarn / Continuous Strand").

33. Thread t-shirt yarn through straps and tie knots on both ends.

34. Loop the mask around your neck. You can wear it like this until you are ready to cover your face.

35. To cover your face, pull on the ends of the ties until the mask fits your face. Tie behind your head.


Check out my other 3D Origami Face Mask tutorials:
How to Sew a 3D Origami Face Mask (Illustrated)
How to Create a 3D Origami Mask Tracing Template
Resources
that inspired my design:
- àplat.com’s “DIYCotton Face Mask” pattern and tutorial.
- Fashion-Incubator.com’s “4Mask Sewing Tutorials: More Efficiency, Less Pain.”
- Thoan Nguyễn Vlogs’ video “How to Sew a Simple 3D Mask.”
I hope you use Alana Lee Designs Origami face mask
design for individual, non-commercial use, and especially to donate to those in need. But if it helps pay rent and buy food, by all means, please use this pattern.


