Canva backgrounds featuring red plaid, ocean waves, and red houndstooth. To use, save image to your device. Open Canva.com
or the app, and choose "Invitation (Square)" > Blank, and then click
on the "Uploads" icon (or camera icon in app) to upload the image from
your camera roll or computer. You are ready to add text with all the
details of your party. (These images work best for texting your invitations rather than printing.)
Many of you might not know that I taught college-level writing courses for eight years. Of the four classes that I taught (basic comp, first-year comp, advanced comp, and advanced tech writing), teaching Advanced Composition was one of my very favorite things I've ever done. And I've developed a lot of tips, tricks, templates, and content to help my students over the years. One of these templates is for essays in MLA format.
Microsoft Word is great software for writing essays, but the default settings will interfere with a properly formatted essay--especially because Word automatically adds extra spacing each time you hit enter to create a new paragraph (improper spacing may be considered a crime by some teachers).
For MLA formatting, this should be set to "0" and "Double."
I designed a Word Template to ensure perfect formatting every time. Apply STYLES (HOME tab) to each line or paragraph by clicking anywhere on the line or paragraph, and applying the appropriate Style. Each style has been named so you can easily identify which style needs applied to which part of your essay.
Do a search for the folder Custom Office Templates on your computer (hard drive or cloud) and then save this
file in that folder.
Open Microsoft Word.
Options appear to open files on a HOME tab, including a file option called Blank. The MLA template might show up under New files at the top of the page, but if not, then click on the NEW tab in the left sidebar, and then click on PERSONAL (to the right of "Office"). Scroll until you find Mrs Lee's MLA Essay Template 2021 and then click on it. (Note: by opening the file this way, you are not opening the actual template, but a new doc with the template formatting embedded.)
You can always personalize the template (like adding your name in
the heading and header) and then re-save it as a Word Template (.dotx) in your Custom Office Templates folder.
Or, if it doesn't appear at the top, click the NEW left sidebar, and then click PERSONAL.
Additional tutorials on how to use Styles in MS Word:
Canva backgrounds featuring millennial pink. To use, save image to your device. Open Canva.com or the app, and choose "Invitation (Square)" > Blank, and then click on the "Uploads" icon (or camera icon in app) to upload the image from your camera roll or computer. You are ready to add text with all the details of your party. (These images work best for texting your invitations rather than printing.)
I realize that many people use Canva to customize their own digital invitations for gatherings large and small, so I will be adding a Canva Templates to my collection over the next few months. And, of course, they are free.
To use, save image to your device. Open Canva.com
or the app, and choose "Invitation (Square)" > Blank, and then click
on the "Uploads" icon (or camera icon in app) to upload the image from
your camera roll or computer. You are ready to add text with all the details of your Halloween party. (These images
work best for texting your invitations rather than printing.)
Print these free digital Halloween party invitations just as
you would a 4x6 photo.
My free gift to say Happy Halloween!
Just (right-)click on the image and save as. You can print your invitations on your home printer and then fill
out your party information using a fine-tipped sharpie or ballpoint pen. I
suggest printing 1-2 on a page (as 4x6 sized images) using your computer's
photo/image software. You can also send this file to print at your favorite
photo lab. If you're having trouble, please google it as I do not provide tech
support. Enjoy!
Download your FREE Pirate Birthday Party Invitations
(med-resolution). Just (right-)click on the image and save as. You can print
your invitations on your home printer and then fill out your party
information using a fine-tipped sharpie or ballpoint pen. I suggest printing 1-2 on a page (as 4x6 sized images)
using your computer's photo/image software. You can also send this file to print at your favorite photo lab. If you're having trouble,
please google it as I do not provide tech support. Enjoy!
The
coronavirus/COVID-19/SARS-CoV2 pandemic, with its global reach, has
resulted in both suggestions and orders that people wear face masks when
in public or medical settings. I
have spent nearly two months sewing face masks to donate to medical
workers, hospital guests, and my family and neighbors. I've tried making
at least three different designs. Through trial and error and a lot of
research, I designed this 3D Origami face mask pattern and tutorial to
share with those who would also like to make masks to donate. It's my
favorite pattern and fits the best, especially because it helps reduce
fog on my glasses. (If the economic slowdown has impacted you, feel free to use this pattern to put food on your table.)
For a printer-friendly version of this DIY face mask sewing tutorial, click here.
You will need:
100% cotton fabric (11” x 17.5”)
T-shirt yarn (or old
t-shirt to make
the ties;
cut at 1.5” wide)
Sewing machine
Thread
Scissors
Pins
Iron and ironing board
1. Choose a size, then cut 2 pieces of fabric: 7.25" x 10.25" (fits women well); 8" x 10.5" (fits most men).
2. Sew a 1/4" seam on six sides, leaving the right and left sides open. 3. Cut a strip 1.5" x 10". This will be sewn into straps later.
4. Fold strip edges to center (forming bias tape). No need to press. You can just get the end started and form it as you sew.
5. Sew about 1/4" seam through all four layers of fabric.
6. Now you have a strap that will be used to hold the ties in place.
7. Cut the strap into four pieces that are 2.5" long.
8. Cut notches in the four corners to create flat corners when the mask is turned inside out.
9. Turn inside out.
10. Flatten seams to prepare for pressing.
11. Fold in opened edges 1/4" and press all seams.
12. Closer look at the opened edges folded in and ironed.
13. Create a template to guide the folds in the next few steps. 2.75" for women; 3.5" for men.
14.
Fold top over. The floral side will be the outside of the mask; the
solid blue side will become the inside of the mask (that touches your
face).
15. Fold the bottom up. Hold the folds in place.
16. Slide out the template.
17. Press the folds.
18. Now your mask should look like this.
19. Fold two straps and slide them in the top and bottom of the openings on the right and left side of the mask. Pin in place.
20. Sew a 1/8" seam to secure the straps and close the opening.
21. Repeat on other side. Right and left ends now have straps (to hold the ties) and are sewed closed.
22.
This part is a little trickier. You are going to sew an open rectangle,
but only on the parts of the mask where the floral folds overlap the
solid blue fabric. Begin sewing 1.25" from the far right edge of the
mask (not including the straps). Remember to backstitch each end.
23. Turn the fabric and sew a tight seam (1/8" or less) down the side. Stop 1.25" from the end.
24. Stopping 1.25" from the end, turn the mask and sew the floral folds where they overlap the solid blue fabric.
25. After sewing the fold overlaps in place, turn the mask and sew a tight seam down the side until it closes the rectangle.
26.
Can you see the open rectangle? It is only open where the flowered flap
does NOT overlap the solid blue fabric. (Click on the image to enlarge
it to see the seams better.)
27. Open the mask and fold it the opposite direction, like in the image below.
28. Your mask should now look like this (below).
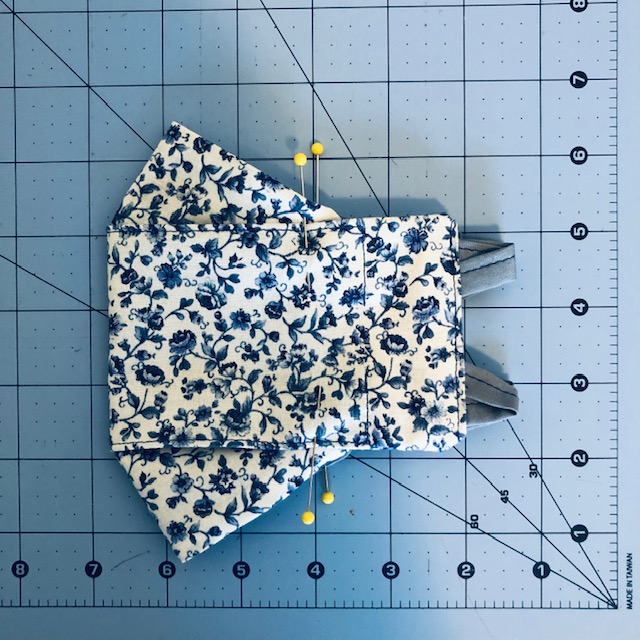
29. Pin where the flaps and folded fabric overlap (on both sides). Pin while mask is folded to get the placement right.
30. Sew the flap in place with a 1/8" seam--just enough to tack the flap open.
I hope you use Alana Lee Designs Origami face mask
design for individual, non-commercial use, and especially to donate to those in need. But if it helps pay rent and buy food, by all means, please use this pattern.